Automation Lanes & Shape Presets
Automation is how a parameter moves over time instead of sitting still: a filter opening across a build, a reverb swelling on the last word of a line, a delay feedback climbing into the chorus, a sound travelling around your head. In Homecrate you draw automation onto a clip, and it plays every time that clip plays.
Automation lives in the clip editor, under the waveform (audio) or under the note grid (MIDI). Long-press any clip — or tap its ✏️ pencil icon — to get there.
The Automation Canvas
Below the waveform is a horizontal strip: the automation canvas. It spans the clip, with a dashed centre line for reference. Until you pick something to automate it shows “Select a param below to draw automation.”
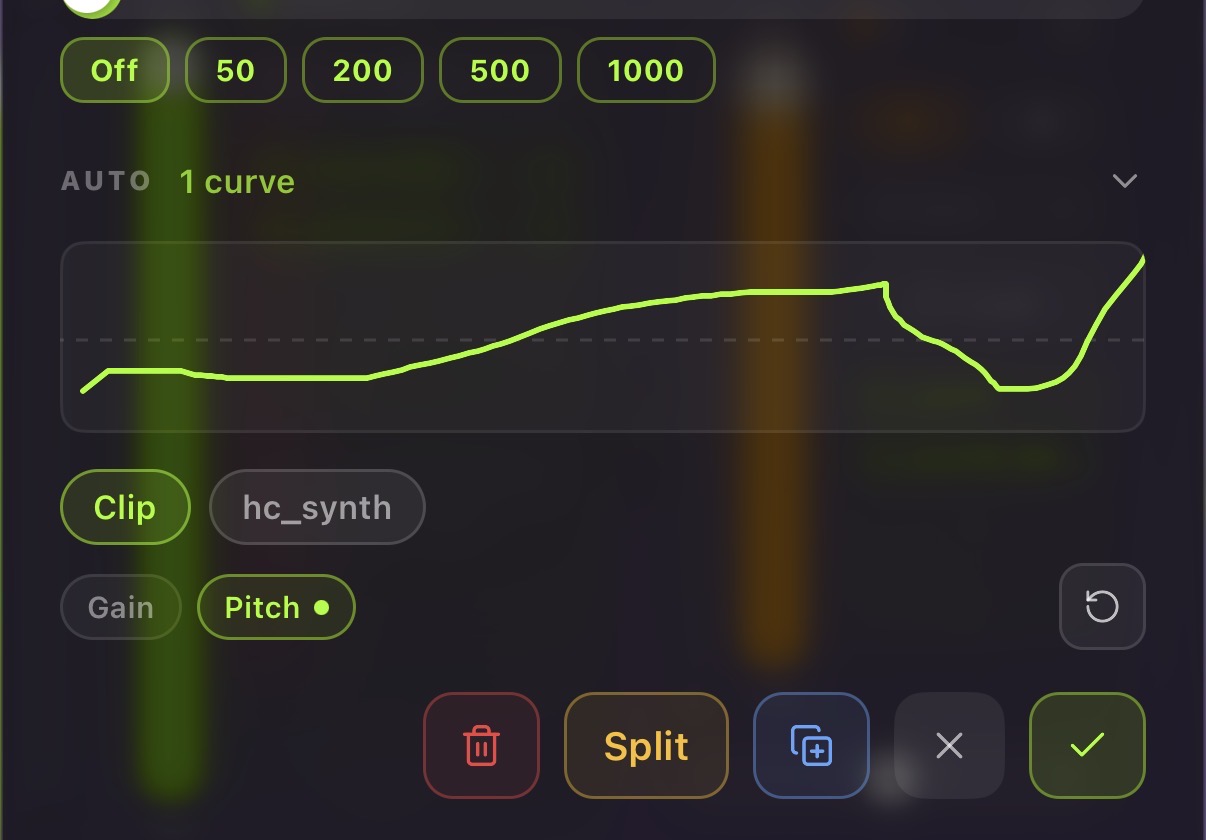
Underneath the canvas are two rows of chips:
- Slot chips — what you’re automating (the clip itself, or a plugin loaded on the track).
- Parameter chips — which control on that thing.
Pick a slot, pick a parameter, then drag across the canvas to draw. Your finger traces the value over the clip’s length. Draw again over the same region to redraw it.
- A parameter chip with a small dot already has automation on it, so you can see at a glance which lanes are in use.
- The ↺ reset button at the end of the parameter row clears the lane you’re currently editing.
- Automation is saved when you tap Apply, alongside your trim and clip settings.
What You Can Automate
The Clip slot
The Clip chip exposes parameters that belong to the clip itself, no plugin required:
| Parameter | What it does |
|---|---|
| Gain | The clip’s level over time — rides, dips, ducks under a vocal |
| Pitch | The clip’s pitch over time — drops, rises, tape-stop style effects |
Plugin slots
Every AUv3 plugin loaded on the track gets its own chip, labelled with the plugin’s name. Selecting it loads that plugin’s full parameter list — so anything the plugin exposes, you can automate. See AUv3 Plugins Overview.
Plugins with a very large parameter list (like Homecrate Drum, which has per-pad controls) also show a group row between the slot chips and the parameter chips, so you can filter down to one pad or section at a time instead of scrolling a few hundred chips.
Spatial position
In Spatial Mode, the slot row shows a single Spatial chip with three parameters:
| Parameter | Range | What it does |
|---|---|---|
| Azimuth | 0–360° | Where the source sits around you horizontally |
| Elevation | −90° to +90° | How far above or below you it sits |
| Distance | 0.5–5 m | How near or far it feels |
Draw those three and a sound moves through the room across the clip — a guitar sweeping left to right, a vocal lifting overhead, a pad receding into the distance. The 3D view shows the resulting motion as an animated trail during playback.
🔒 Pro feature. Spatial Mode — and therefore spatial position automation — is available with Homecrate Pro.
Shape Presets
Drawing by hand is fine for a gesture, but for a clean ramp or a controlled swell you want a curve, not a finger wobble. Long-press any parameter chip to open the shape preset overlay.
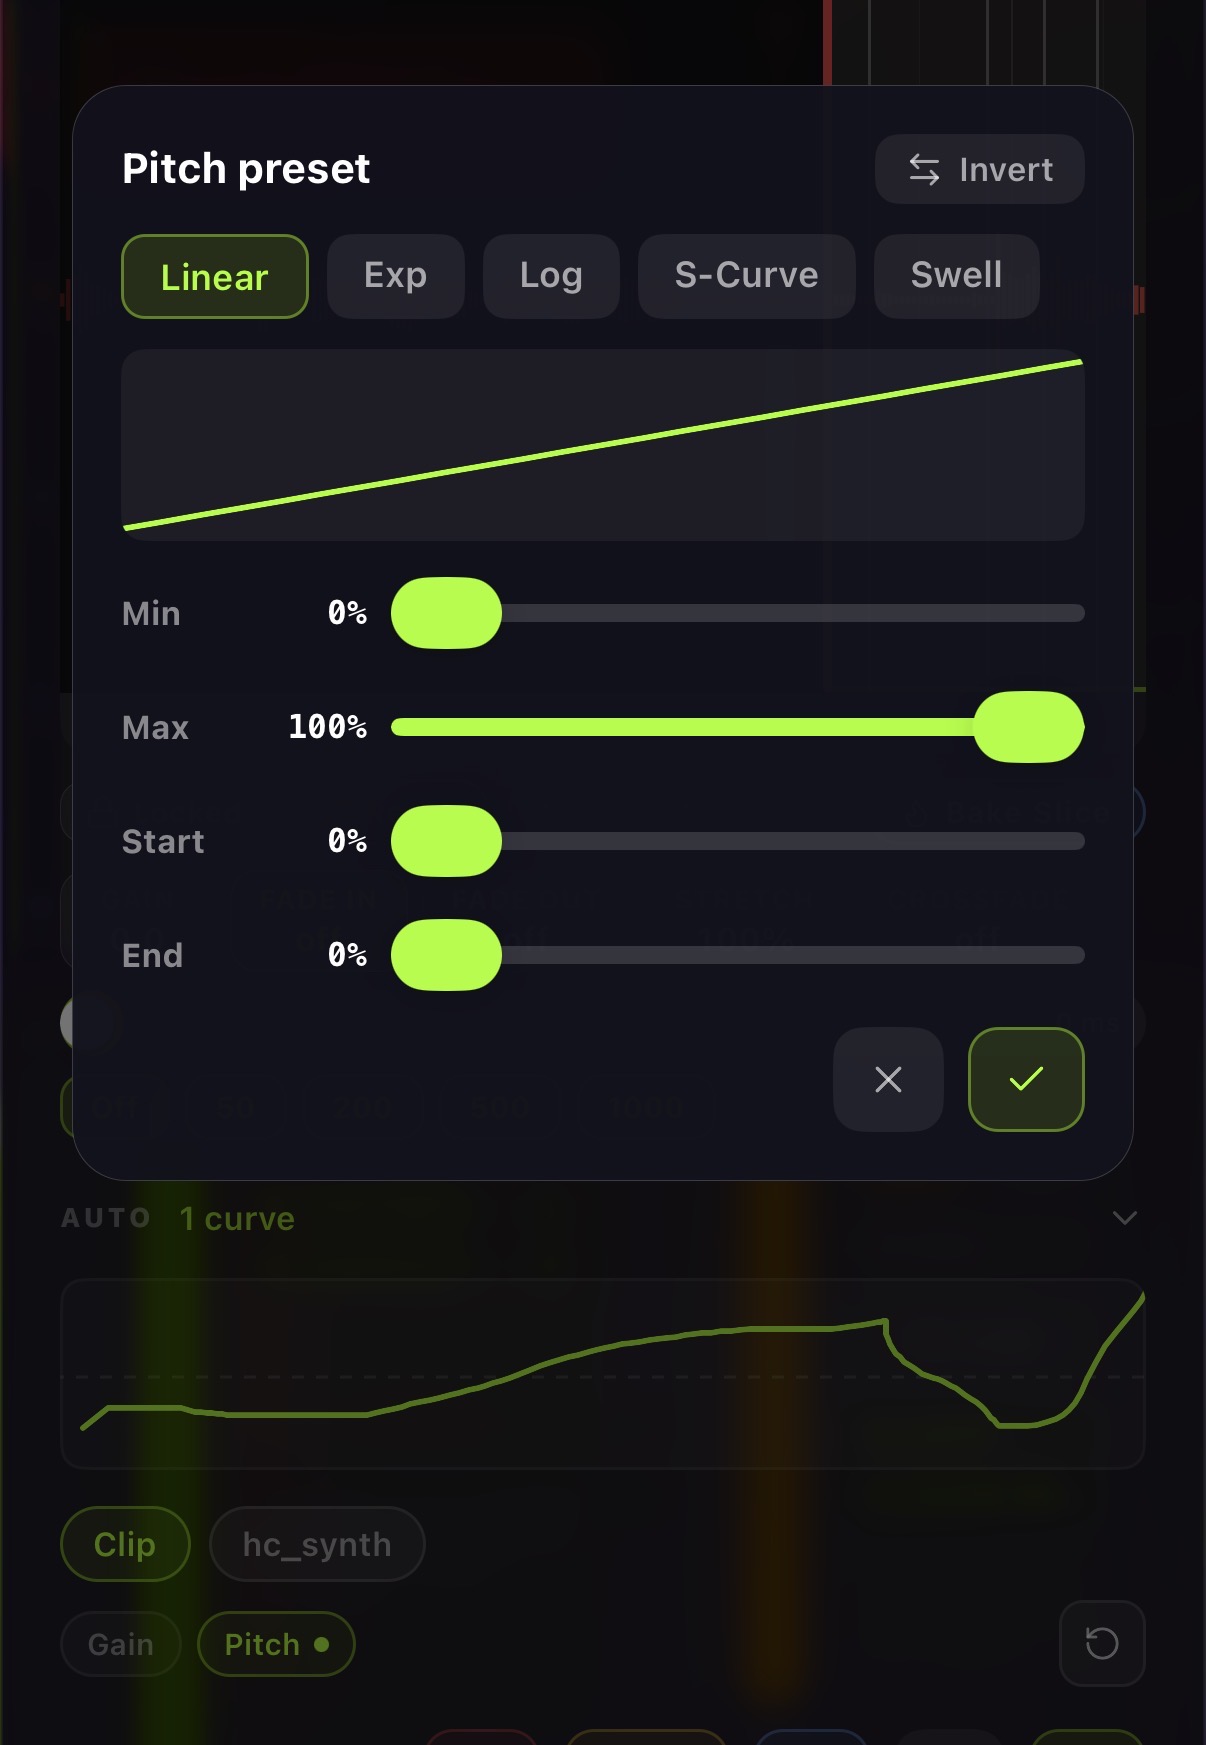
The overlay shows a live preview of the curve as you adjust it. Tap the check to write it across the clip; tap the ✕ to back out.
The Shapes
| Shape | Character | Reach for it when |
|---|---|---|
| Linear | A straight ramp | You want an even, predictable move |
| Exp | Slow start, late rush | A build that holds back then arrives all at once |
| Log | Fast start, soft landing | An immediate move that settles gently — filter opens, then eases |
| S-Curve | Eased at both ends | The most natural-feeling ramp; almost always the safe choice |
| Swell | Up and back down | Something that blooms and returns — reverb on a phrase, a volume swell |
Shaping Controls
| Control | What it does |
|---|---|
| Invert | Mirrors the curve within your min/max range — turns a rise into a fall, and the Swell into a dip |
| Min / Max | The value range the curve travels between. Set them close together for a subtle move, or reversed-feeling ranges with Invert for falls |
| Start offset | Holds the starting value for a fraction of the clip before the ramp begins |
| End offset | Arrives at the final value early and holds it to the end of the clip |
Applying a preset replaces whatever is currently on that lane across the clip’s active span. If you want to keep a hand-drawn envelope, apply the preset to a different parameter or undo afterwards.
Automation on MIDI Clips
MIDI clips automate too — and their lanes target the instrument on that track, so you can move a synth’s cutoff or a sampler’s decay across the clip. Open a MIDI clip in the piano roll or the drum sequencer and you get the same canvas, the same parameter chips, and the same long-press shape presets.
The instrument’s own parameter list drives what’s available, so a Homecrate synth clip offers synth parameters, a drum clip offers per-pad parameters, and a third-party AUv3 instrument offers whatever it exposes.
How Automation Survives Editing
Lanes are stored as points across the clip, and Homecrate is careful to keep them musically attached to the audio:
- Trimming — the lane stays put; the trimmed region simply plays the part of the envelope it covers.
- Time-stretching — the envelope stretches with the audio, so a swell that peaked on beat three still peaks on beat three. See Time-Stretch & Fitting Clips to Tempo.
- Splitting — both halves keep the automation and each plays its own portion of it, so a split is inaudible. MIDI clip automation is recalculated per half to the same effect. See Splitting Clips & Crossfading.
- Duplicating — a duplicate carries the automation with it.
- Moving — the lane travels with the clip.
A couple of things worth knowing:
- Automation is per clip, not per track. There is no track-wide automation lane running the length of the song; if you want a filter sweep across a whole section, it lives on the clip (or clips) covering that section.
- Outside the drawn range, values hold. If your envelope only covers the middle of a clip, the first and last points hold their value out to the clip edges rather than snapping back to the plugin’s setting.
- Automation only moves a parameter while the clip is playing. When nothing is playing over it, the plugin sits at whatever value its own UI shows.
- Automation is sampled continuously during playback, not applied as a one-shot — so curves sound smooth, but extremely fast zigzags drawn by hand will be smoothed rather than reproduced sample-accurately.
Tips
- Long-press before you draw. A shape preset takes two seconds and beats a hand-drawn ramp almost every time. Hand-draw only when you want a gesture that isn’t a curve.
- S-Curve with a small Min/Max range is the secret to automation that sounds intentional rather than obvious.
- Use Start offset for builds. Hold the value for the first half of the clip, then ramp — a move that arrives late reads as much more dramatic than one that starts immediately.
- Swell + Invert = a duck. Perfect for pulling a pad down under a vocal line and letting it back up.
- Watch the dots. If a mix is behaving strangely, the dots on the parameter chips tell you exactly which lanes have data on them.
- Split, then automate. If only part of a long clip needs a move, split it and automate the piece — you get a much finer canvas to draw on.