Audio Warping (Transient Timing)
✨ New in homecrate 1.12. If you don’t see it yet, update from the App Store.
Sometimes a take is right but not in time. The feel is there, the tone is there, and one snare lands a hair late and the next phrase rushes. Re-recording it means losing the performance you liked.
Warping fixes that. You drag individual hits into place on the clip’s waveform, and Homecrate stretches the audio between them to compensate — speeding up one stretch, slowing down another. The performance stays; the timing changes.
The important part: warping never changes how long the clip is on the timeline. Nothing after it moves. Nothing needs re-aligning. You’re redistributing time inside the clip, not adding or removing any.
Opening the Warp View
Long-press a clip (or tap its ✏️ pencil) to open the Clip Edit modal. The waveform there is where warping happens.
[SCREENSHOT: Clip Edit modal — waveform with detected transient ticks along it]
As soon as the clip’s audio is loaded, Homecrate analyses it on-device and marks every transient it finds — the sharp attacks that define the timing of a part. Drum hits, plucked notes, consonants in a vocal. These show as thin neutral ticks with a small diamond cap.
Transient detection is automatic. You don’t run it, and it’s all done on your device — nothing is uploaded.
Warping a Hit
Warping uses a deliberate two-step gesture, so that a stray finger can’t nudge your timing while you’re scrolling or zooming:
- Tap a transient tick to select it. It highlights.
- Drag the selected handle left or right to move that moment in time.
- Long-press a marker to delete it and give that section back to the surrounding audio.
The hint under the waveform says it in short form: Tap again to pin · drag to warp · long-press deletes.
A tick you’ve moved becomes an amber marker, and a dim ghost tick stays behind at its original, un-warped position — so you can always see exactly how far you’ve pulled a hit and by which direction.
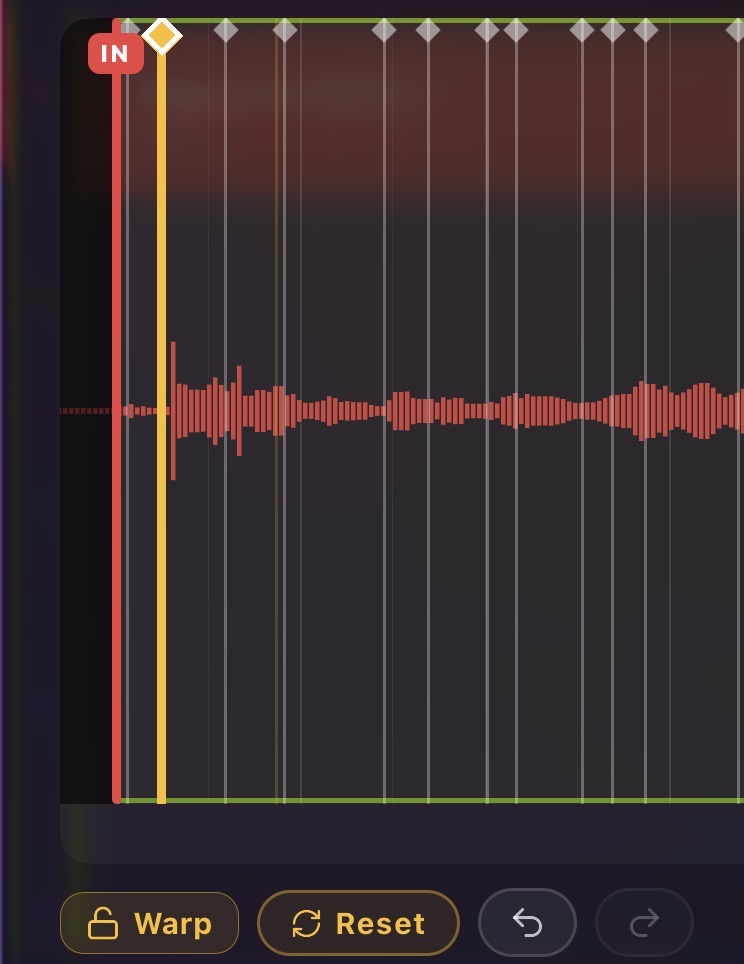
Snapping
While you drag, the marker snaps to nearby transients so it’s easy to lock a hit onto a neighbouring attack. If your project has a tempo set, a beat grid is drawn behind the waveform and the snap adapts to your zoom level — zoomed out you snap to coarse divisions, zoomed in you get fine control.
The Waveform Redraws Warped
This is the part that makes warping feel real rather than abstract. As you drag, the waveform itself redraws in its warped shape. The section you compressed gets visibly narrower, the section you stretched gets wider, and every other detected transient slides to its new warped position so it stays glued to its own attack.
You’re not looking at the original audio with markers floating over it. You’re looking at what the clip will actually sound like.
Preview playback honors your warp as you work, so you can hear the edit before you commit it.
Warp Tools
Under the waveform:
| Control | What it does |
|---|---|
| Reset | Removes every warp marker on the clip and returns it to its natural timing |
| ↶ Undo | Steps back through your warp edits |
| ↷ Redo | Steps forward again |
These are local to the warp session — they walk through your marker moves specifically, which is far more useful than undoing your whole editing session one step at a time.
When you apply the modal, the warp lands as its own entry in the project’s main undo history, so you can also back the whole thing out later from the timeline.
Warp vs. Time-Stretch
Homecrate has two ways to change timing, and they do different jobs:
| Time-Stretch | Warp | |
|---|---|---|
| What it does | Scales the whole clip uniformly | Redistributes timing within the clip |
| Clip length on timeline | Changes | Stays exactly the same |
| Use it for | Fitting a loop to the tempo, halving/doubling a part | Fixing hits that rush or drag |
They work together, but they don’t fight over the same job. Stretch decides how long the clip is; warp decides how the time inside it is shared out. Add warp markers and the even, uniform stretch you had before gives way to your marker positions — the clip is still exactly as long as Stretch says, it just no longer flows at one constant rate from end to end.
Because of that relationship, changing the Stretch slider on a clip that already has markers rescales those markers proportionally. A hit you dragged onto beat 3 stays on beat 3 relative to the new length. Your musical intent is preserved rather than scrambled.
Practical order of operations: set the clip’s overall length with Stretch first, then warp the hits inside it. It works the other way around too, but you’ll spend less time double-checking.
Limits
Warping is a real audio process, and it has boundaries:
- There’s a limit to how far one hit can travel. Drag a marker far enough that the audio either side of it would have to be mangled to keep up, and Homecrate declines the move rather than handing you a smeared result. Big timing repairs are better solved by splitting the clip and moving the pieces.
- Markers need room to breathe. Two markers dropped almost on top of one another have no span between them to give or take time, so nothing happens.
- Markers outside the clip’s trimmed region don’t participate — trimming a clip cleans them up automatically.
- Aggressive warping on sustained, tonal material (a held pad, a long vocal note) will sound more processed than the same amount of warping on percussive material. Transient-heavy parts take it best.
Bake Slice — Committing the Result
Warping, stretching and trimming are all non-destructive. Your original file is never modified; the clip just tells the engine how to play it.
That’s usually what you want. But once a clip is settled — especially a small slice taken out of a long recording — carrying the whole original file around gets awkward. Editing it means scrolling through minutes of audio to find your two seconds.
Bake Slice solves that. It renders the trimmed span — including your stretch and your warp — into a brand new audio file, and points the clip at it. The clip comes back with:
- Trim reset to the full length of the new file
- Stretch reset to 100%
- Warp markers cleared
Nothing changes about how it sounds or where it sits. What changes is that the clip is now a clean, focused piece of audio you can edit from a fresh start.
[SCREENSHOT: Bake Slice button in the warp tools row]
Note: Bake Slice appears in the warp tools row when the clip is trimmed — an un-trimmed clip already is its whole file, so there’s nothing to bake.
Baking creates a new file rather than overwriting the original, so your source recording stays intact.
Reverse
Also in the Clip Edit modal: Reverse writes a new, reversed copy of the audio and swaps the clip onto it, so the clip now plays backwards.
It’s the fastest route to reverse-cymbal swells, backwards-guitar risers into a chorus, and sucked-in transitions. Since it writes a new file, the forward original is untouched — and reversing a reversed clip gets you back where you started.
Zooming the Waveform
Precise timing work needs precise zoom. Pinch the waveform in the Clip Edit modal to zoom in and out.
The zoom range is large — you can go from seeing an entire multi-minute file to working at close to millisecond resolution, which is where timing work actually happens. Zooming deep into a long recording stays smooth rather than grinding to a halt, so you can work at that resolution on a full take, not just a short slice.
Transient snapping adapts as you zoom: coarse when you’re looking at the whole part, fine when you’re on a single hit.
Tips
- Zoom in before you drag. At full-clip zoom a single pixel can be many milliseconds — you can’t place a hit accurately at that scale.
- Fix the strongest hit in a bar first, then work outward. Placing the anchor points correctly often pulls the surrounding audio close enough that you don’t need to touch it.
- Use the ghost tick as your conscience. If a marker is a long way from its ghost, you’re asking for a lot of the audio around it — consider whether a punch-in would sound better.
- Fewer markers is usually better. Every marker you add is another point the audio has to bend around. Two well-placed markers often beat eight fussy ones.
- Preview constantly. Warping is a feel edit — your ears will tell you what looks fine on screen and doesn’t sit right.
- Bake once you’re happy with a slice you’ll come back to, so future edits start from a short, clean file instead of the full take.
- Percussion warps best. For a vocal, warp the consonants — they’re what Homecrate marks anyway — rather than trying to move the middle of a held note.